Lesson 2: Essential Tags
Overview
There are some basic tags you must add to every HTML document you create. In the previous unit, you created a new file called index.html. In the current lesson you will add a few basic required tags to this file, thereby beginning the construction of your portfolio. These basic tags provide a template for any web page.
A note about Notepad++. This is a free download that is very versatile. Almost every computer comes with a simple text editor. On Windows machines, that's called Notepad. However, it doesn't do anything besides edit simple text. Notepad++ (from here out referred to as N++) won't write your code for you, but it does make it easier to write that code. It adds color to your code to help you write it better. This is similar to how MSWord underlines misspellings in red and grammar mistakes in blue. Eventually, we'll talk about about actual web design programs. They make designing web pages easy, but they don't necessarily write good coding. For the purpose of this class, you'll need to use N++. Let me make it clear, that using anything beyond that is cheating and is very noticiable in your coding. This is the same as using Google Translate to write your French or Spanish homework. It's obvious that it's been used and you'll recieve a zero on the assignment.
Here's a great video that shows you the basics of N++. Notepad++ Tutorial
Learner Outcomes
At the completion of this exercise:
- you will have learned the basic tags required for all HTML documents and be able to create a blank HTML page with all of the essential tags in place.
Activities
- Open N++ and navigate to the "portfolio" folder you created in the Pre-coding lesson. Open the index.html file.
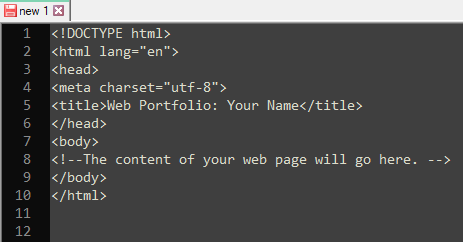
- Type the following markup into your file. This is the basic HTML structure of a web page. Note that you'll personalize the text contained in the title tags.
You may find it easier to read if you add extra blank lines as you see in the example above. Also, indenting content that is inside of other content helps you to see the relationship between all the parts of the page. This is a standard practice for all markup, scripting, and programming languages.
Remember: Extra spaces and blank lines will be ignored when the HTML is displayed by a browser.
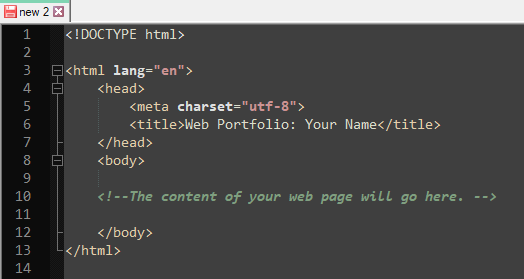
Also, don't hesitate to use the power of indentation within N++. Visually, it is much easier to navigate through your coding when you indent as necessary. Compare the following two pictures. The second image shows indentation as well as the language of the doc being set to html. Setting the language enables N++ to color code the look of your programming. Let me be clear; you have to put in the indentation yourself.
Let's now examine each of these tags:
- The first line is the DOCTYPE. It specifies the version of HTML you are using. HTML5 has a very simple DOCTYPE. All prior versions of HTML and XHTML had much longer and complicated DOCTYPE statements, but they can easily be found by searching the web, and can be copied and pasted into your web page. The DOCTYPE statement is necessary because it tells the browser which version of HTML you're using, so the browser knows how to process your code. . A common mistake among web developers is neglecting to include a DOCTYPE statement. Without a DOCTYPE statement, browsers have to guess which version of HTML you're using, and sometimes they get it wrong. Your page won't pass the validity test without it.
- <html> is typed before all the text in the document. This marks the beginning of the html document. It has a corresponding </html> tag that marks the end of the document. The entire web page, other than the DOCTYPE statement, is wrapped between these two tags. Also, notice that this tag has an attribute of lang="en". This is a required attribute, since your pages won't validate (we'll more about this later) without it.
- <head> Web pages are divided into two main sections: the head and the body. The head provides information about the document, including the author, description, keywords, title, and other information. The head section is closed with the </head> tag. In our "bare bones" document there are only two elements inside the head. They are:
- <title> You must give your document a title. This title doesn't actually appear within the web page, but appears in the title bar of the browser window. This is also the title of the page that will be displayed by default in search engine results or in user's Favorites. The title is closed with </title>
- <meta> is a tag that has many purposes, depending on what attribute it has. In our "bare bones" document, the attribute is charset, which is set to "utf-8". This is a required tag, which tells the browser which character set the web page is encoded in. There are many possible character sets, but "utf-8" is an international character set that is one of the most common. The <meta> tag is not a container tag. Therefore, it has no corresponding closing tag.
- <body> The body section contains the contents of your document.
- <!-- Comment --> Comments are intended solely for people reading the source code, and are not visible when someone views the web page in a browser. See the section below on Comments In Your Code for additional information about this feature.
- Save the index.html file. Now open this file in your browser. You will notice that the screen is blank. This is because you don't have any content yet in your body section. However, you should see your title displayed in browser's title bar, usually across the top of the browser window. Now is a great time to learn to validate your page.
- Open the HTML Validator link from below.
- Click on the "Validate by File Upload" tab.
- Click on "Choose File" and navigate to your index.html file, select it, and click "Open".
- Click "Check"
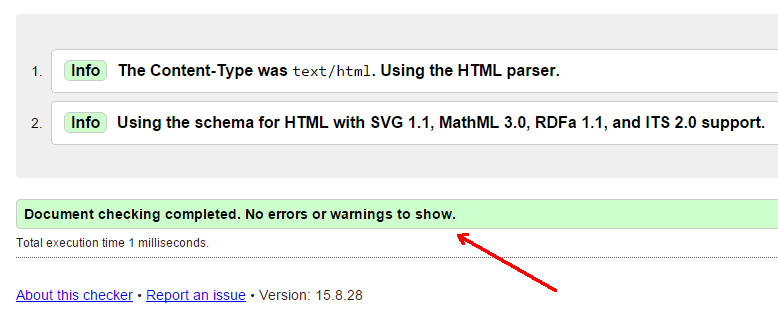
- Look over the resulting page. You should see something similar to the following image, especially the bottom line. It should say "No errors or warnings to show." If it doesn't then, you need to read the report to find your errors. If you need, help interpreting this, please ask.
- Return to the text editor and the index.html file. While you're creating files using the "bare bones" template, you should go ahead and create the other files that will comprise your website. Later in this course, you'll be adding content to each of these pages, but for now they'll be blank, just like the home page. Simply copy the code from index.html and paste it into the new pages. Each time you do this, change the <title> element to reflect the content of the new page. For example, change the title in graphics.html to something like "Web Portfolio: Your Name's Graphics Page". Save each new file in your root folder with the following file names:
- accessibility.html
- graphics.html
- javascript.html
- usability.html
- tools.html
- video.html
- Create one last "save as" file named template.html. In the future, you can open this file and perform a "save as". Using this technique, you won't need to type the "bare bones" each time.
Comments In Your Code
The sample HTML code provided and described on this page includes the HTML markup for adding comments:
All computer markup or programming languages provide some method for adding comments to your code. This includes all three of the languages taught in this course: HTML, Cascading Style Sheets (CSS), and JavaScript. The actual method differs depending on the language, but the idea is always the same. Comments are notes to yourself, or to others who view your source code, that help to make the code easier to understand. The web browser simply ignores them, so they aren't actually displayed to users. Add comments liberally! Too many comments is better than too few. Here are the two primary purposes for adding comments to your code:
- Use comments to explain your code to others. Often, you will be creating web pages as a member of a team, and other team members may need to read and understand your code. Even if you're the only person working on a particular web page, there may be others later who need to read and understand your code. This is also a fun way to leave a little bit of yourself if someone uses your code. Believe me, if your page is on the web, someone is going to look at your code. You can't prevent it. All code is usable, and you can't copyright code. You can only copyright the actual content that appears on the page. So why not leave little notes to future coders? It's like a message in a bottle. Keep them helpful and humorous if you wish, but by all means, clean. Personally, I like to leave references about my passion, Star Trek.
- Use comments to explain your code to yourself. As you're learning new web design techniques, it can be very helpful to add reminders to yourself as to why you used a particular tag or group of tags. I use this option a lot. If you will be editing the same document over time, you may not always remember what you did to a section 3 years ago. Trust me. Use comments, even if you don't think you'll use them.
Transfering your Files
Now that you have some basic information in your web pages, you can click on them and view them on your computer. But no one else can. To change that, you will transfer your web files to a web server that has been set up for you. Please refer to the assignment from your teacher that instructs you in this progess.
Resources/Online Documents
All done?
Complete the Exit Ticket, then proceed to Lesson 3.