Lesson 1: Creating a Data Table
Overview
Tables were introduced to the web with the original purpose of displaying data in rows and columns. In time they came to be used for an additional purpose: page layout. This lesson will focus on their original purpose. Page layout will be explored later in this course.
To be honest, when I first learned html, using a table was the easiest and most eye-pleasing way to layout a page. It didn't yield much to creativity, but it kept everything in it's place no matter the size of the window open. But with expanded CSS, can put tables back into their place, organizing information.
In this lesson you'll add a simple data table to your portfolio. Additionally, this will be the first time you will work with a page other than your index.html file.
Learner Outcomes
At the completion of this exercise:
- you will be able to create a simple data table that includes <table> <caption>, <thead>, <tbody>, <tr>, <th> and <td> elements as well as scope attributes.
How to Create an HTML Table
Pay particular attention to following information on creating a table.
- HTML tables begin with <table> and end with </table>.
- Inside the table element, you can optionally include a caption element, which contains a brief title or description of the table's content. Most browsers display the caption above the table.
- Like HTML documents, tables include a head and body. In tables, these are specified using the <thead> and <tbody> elements respectively. These tags are optional, but they should be included on long tables. If long tables are printed and span multiple pages, browsers will repeat the content of the <thead> element (usually the top row(s) of the table) at the top of every printed page.
- Each row in a table begins and ends with table row (tr) elements: <tr></tr>
- Each cell in the table begins and ends with either table header (th) elements or table data (td) elements, depending on what type of information the cell contains.
- If a cell contains headers, it begins and ends with th elements: <th></th>
- If a cell contains data (not headers), it begins and ends with td elements: <td></td>
- Table header elements (th) should also include a scope attribute, which is either scope="row" or scope="col". This instructs screen readers as to which headers apply to which cells. Screen readers read tables row by row from left to right, and without this extra markup blind users would have a difficult time figuring out which headers apply to the cell they're in. It should be noted that your table will display without these attributes, but our goal is to learn coding that reaches the widest possible audiance.
Compare the following table with the code that was used to create it:
| Monday | Tuesday | Wednesday | Thursday | Friday | |
|---|---|---|---|---|---|
| Carnivores | Sausage pizza | Corn dogs | Sloppy Joe | Beef taco | Chicken and dumplings |
| Herbivores | Veggie pizza | Veggie dogs | BBQ tempeh | Bean burrito | Tofu teriyaki |
<table>
  <caption>School Lunch Menu</caption>
  <thead>
    <tr>
      <td> </td>
      <th scope="col">Monday</th>
      <th scope="col">Tuesday</th>
      <th scope="col">Wednesday</th>
      <th scope="col">Thursday</th>
      <th scope="col">Friday</th>
    </tr>
  </thead>
  <tbody>
    <tr>
      <th scope="row">Carnivores</th>
      <td>Sausage pizza</td>
      <td>Corn dogs</td>
      <td>Sloppy Joe</td>
      <td>Beef taco</td>
      <td>Chicken and dumplings</td>
    </tr>
    <tr>
      <th scope="row">Herbivores</th>
      <td>Veggie pizza</td>
      <td>Veggie dogs</td>
      <td>BBQ tempeh</td>
      <td>Bean burrito</td>
      <td>Tofu teriyaki</td>
    </tr>
  </tbody>
</table>
Not sure how the HTML table markup works? Here's a video explaining a different html table. Table tutorial
Activities
- Earlier in this course, in the lesson titled How People with Disabilities Access the Web, you learned how certain web design strategies and techniques can create barriers for people with disabilities and others. In the current lesson, you will use an HTML table to create a web accessibility checklist that you can refer to later as you design websites, to assist you in ensuring that your web content doesn't needlessly exclude anyone.
- Open the file accessibility.html that you created earlier in the course. At this point, this file should include nothing but "bare bones" HTML.
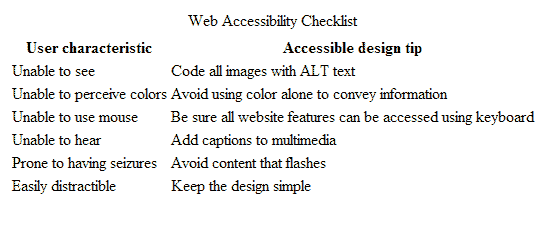
- Use the following instructions to add a table to the body of your web page. Consult the above example table markup as a model. Note that the School Lunch Menu table has three rows and six columns, whereas the Web Accessibility Checklist will have two columns and seven rows. The table you're creating should look something like this:
- Save your work, and check it in your web browser to be sure it looks like you expect it to. If it doesn't, that's normal - tables can be tricky! It sometimes takes several trials to get all the tags just right. Don't worry about spacing between and within cells: We'll be addressing that in a future lesson.
Instructions for Creating Your Table
The caption of the table should be "Web Accessibility Checklist"
The table should have two columns, with the following headers:
- User characteristic
- Accessible design tip
In the first column (the column with header "User characteristic"), list the following user characteristics related to web accessibility, in the order in which they're presented below.
- Unable to see
- Unable to perceive colors
- Unable to use mouse
- Unable to hear
- Prone to having seizures
- Easily distractible
In the second column (the column with header "Accessible design tip"), the following web design issues correspond with the same-numbered user characteristic from the first column.
- Code all images with ALT text
- Avoid using color alone to convey information
- Be sure all website features can be accessed using keyboard
- Add captions to multimedia
- Avoid content that flashes
- Keep the design simple
How to Actually Code this Table!
Tables are coded in rows first, then columns. You have to picture the table row by row to code it. The table at the top of the page (school lunch menu) actually had an empty cell where the days of the week and the two types of cuisine met. So that table was actually 3 rows by 6 columns.
The table you are making only has the two columns (no empty cell). So, in practical terms, your table is 7 rows by 2 columns, plus the cation at the top. Each row is started with <tr>. Look at the following set up for a table row with headings.
<tr> (Opens the table row)
  <th> Table heading tag (bold)</th>
  <th> Another bold tag</th>
</tr> (Closes the table row)
This is a normal table row:
<tr>
  <td> Table data cell(regular font weight)</td>
  <td> Another another data</td>
</tr>
- Insert your cursor where your table is going.
- Open the table tag <table>. Use your enter key to give yourself a few lines. Go ahead and put the closing table tag (unless you have N++ set to do that automatically, in which case, just move the closing tag down.)
- Directly under your opening table tag, code your caption with both opening and ending tags.
- Open the <thead> just below the caption and put the closing tag a few rows below (moving the other tags down).
- Just under the <thead> open a <tr> and push the closing tag a few lines below.
- Just under the <tr> open a <th>. Leave the closing tag on the same line. Type your first heading - User characteristic
- On the next line, open another <th> (and it's closing) and put your seconde heading - Accessible design tip. This is the end of that row.
- This is also the end of the of the <thead> so put your cursor beneath the closing</thead> tag.
- Open a <tbody> and push the closing tag down a few lines.
- Under the opening <tbody>, open (and close) a new <tr> pushing the closing tag a few lines down.
- Instead of a <th> you will need a <td> with its closing tag on the same line.
- Type the first cell of this row in between the td tags. Unable to see
- Open and close a <td> on the same line. In between the td tags, type the second cell for this row. Code all images with ALT text. This is the end of that row, so move your cursor beneath the closing tr tag.
- Now, you are on your own to code the rest of the lines.
- When you are done with the table, you should have 3 closing tags in row (4 in total).
- </tr>
- </tbody>
- </table>
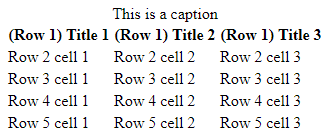
This is what a basic table looks like with 5 rows and 3 columns without any headings on the left. The first row is headings. Remember, the table you are creating has 7 rows and 2 columns.
<table>
	<caption>This is a caption</caption>
	<thead>

		<tr>
			<th>(Row 1) Title 1</th>
			<th>(Row 1) Title 2</th>
			<th>(Row 1) Title 3</th>
		</tr>
	</thead>

	<tbody>
		<tr>
			<td>Row 2 cell 1</td>
			<td>Row 2 cell 2</td>
			<td>Row 2 cell 3</td>
		</tr>

		<tr>
			<td>Row 3 cell 1</td>
			<td>Row 3 cell 2</td>
			<td>Row 3 cell 3</td>
		</tr>

		<tr>
			<td>Row 4 cell 1</td>
			<td>Row 4 cell 2</td>
			<td>Row 4 cell 3</td>
		</tr>

		<tr>
			<td>Row 5 cell 1</td>
			<td>Row 5 cell 2</td>
			<td>Row 5 cell 3</td>
		</tr>

	</tbody>
</table>
The coding above would produce the following table.
Resources/Online documents
All done?
Validate your page. Complete the Exit Ticket. Then, proceed to the next module.